Showing posts with label tutorial. Show all posts

Tuesday, June 15, 2021

Old School Eye Make-up Tutorial for Small, Deep-set and Close-set Eyes

 Today we're going to be doing something very different: an actual eye-make up tutorial. Unfortunately, it's mostly theoretical since my camera really won't capture my eyes properly. Still, I hope this will be helpful to someone, though it's a very specific subset of people who will benefit.


Now, this tutorial is only for someone with small, deep-set and close-set eyes (my own, eye shape). I've been trying out a lot of different styles but I've found that my eye shape requires a fusion of east and west to look most-flattering. This is how you do it, and why:

Thursday, June 7, 2012

Tutorial: Turmeric Mask

Turmeric isn't just for curry and other foods, it's for your face and body too. I use it to help prevent acne while preserving the contents of my poor wallet. 


Ingredients:

Powdered turmeric
Calamansi juice (or lemon juice)
Honey


Powdered turmeric can be bought in a supermarket very easily and cheaply with the spice selection (at least in the Philippines, you may have to go to an asian food store). For the tutorial, I used half a singles sachet or 1.5 grams of ground turmeric by McCormick. The 36g - 12 sachet pack itself costs around P40 (around $1 dollar). While there are cheaper versions available, the packet is less messy and allows me to better control the amount of product i put in.

Calamansi, being native to the Philippines, is easier to find and far less expensive than lemon. I used only 10 drops of freshly squeezed calamansi juice on this mask. I've forgotten how much the honey costs but you'll need 1-2 tablespoons. I started with 1 tablespoon's worth then added as I went.

Here's one way to use turmeric as a mask:

Friday, April 20, 2012

Tutorial: A Noob's Eye Make-up

This is the first time I've done my eye make up for an event. My sister, who normally does my make up for me (because i am n00b), is gone for the next X years. :( (IMY SISTER)

So I did my it all by myself and it turned out quite well. I wasn't able to take a picture of it before the party, but I got a lot of compliments for my eye make up. I took a bunch of pictures when I got home. This is after being on my face for over 6 hours so it doesn't look decent anymore.

Without flash:


I actually placed black eyeliner but the eyeshadow went over it, creating the blue line. There has been some debate over whether to put it before or after, and I chose to do the former. I'm putting it on after next time.


With flash:


Note: Tools and make-up belong to my sister (heehee).

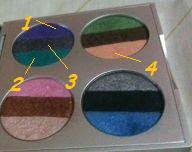
I used these four colors from the Stila Barbie pallet:

stila barbie pallet

And this is how I did it:

eye makeup tutorial

This is meant to be read like an english comic (left to right, up to down). Click to enlarge image :)

Wednesday, April 11, 2012

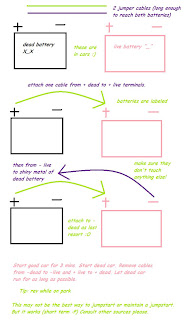
Tutorial: How to Jump Start a Car

visual guide to jump starting


Take this with a grain of salt. I'm not responsible for your car troubles. This is just what works for me.

Monday, January 18, 2010

Tutorial: Aztec Healing Clay Experience

or my favorite way to use aztec healing clay.


Ingredients
1. aztec healing clay
2. honey
3. apple cider vinegar
4. tea tree oil
5. spoon (supposed to be non-metal but...)
6. small plastic container


I placed a heaping spoonful of aztec healing clay into container (I just made sure my spoon was really dry).


Added one flat tablespoon of ACV. I love it when it starts frothing ^^


Added a flat tablespoon honey, then 5 drops tea tree oil and mixed. It's better to add too little in the beginning than too much. If lacking, add more ACV. Make sure you put on a PASTE and not a liquid.


Place a thick layer on face.


How it sucked the oil from my face.

Wash off after 20 mins or until dry with warm water.

Even though it is stinky, it works; It's also really cheap and lasts forever. Not recommended for those with sensitive noses.